Welcome to a comprehensive guide on mastering the art of double-pointed needles (DPNs). This detailed tutorial will walk you through every aspect of using DPNs, from the basics to advanced techniques. Whether you’re a seasoned knitter or just starting out, this resource is designed to equip you with the knowledge and skills to confidently tackle a variety of knitting projects using DPNs.
This guide covers everything from setting up your project with the correct DPNs and grip techniques, to mastering basic knitting and purling stitches, and even tackling more complex patterns and troubleshooting common issues. We’ll explore different project sizes, and discuss the specifics of working with socks and other projects using DPNs.
Introduction to Double-Pointed Needles (DPNs)

Double-pointed needles (DPNs) are a specialized type of knitting needle, crucial for shaping and creating intricate designs in knitted garments. They offer a unique flexibility and precision that circular needles often lack. This allows for a variety of knitting techniques, from seamless socks to complex lace patterns. DPNs are particularly useful for working in the round with smaller projects.DPNs, unlike their circular counterparts, are typically used for smaller projects, allowing for a more controlled and focused knitting process.
The structure of the DPNs facilitates the creation of seamless pieces, offering an advantage in shaping and intricate designs. This is particularly important for projects like socks, mittens, and even some sweaters.
Types of Double-Pointed Needles
DPNs come in various forms, each designed for specific knitting needs. They differ primarily in their construction and length, which significantly impacts the size and type of project they are suited for. Commonly available types include straight DPNs and circular DPNs, which have a cable connecting the needle points.
Common Uses of DPNs in Knitting
DPNs are invaluable tools for a variety of knitting projects. Their unique design allows for seamless, shaped knitting, making them a staple for projects like:
- Socks: DPNs are essential for creating seamless socks, enabling the shaping of the heel and toe.
- Mittens and Fingerless Gloves: The ability to knit in the round makes DPNs perfect for creating these items.
- Small Projects: DPNs are often preferred for smaller projects such as amigurumi or lace patterns.
- Lace Patterns: The precise control offered by DPNs is particularly useful for creating complex lace designs.
Basic Components of DPNs
Understanding the components of DPNs will help knitters choose the right tool for their project.
- Needle Points: These are the sharp tips of the DPNs that hold the yarn and create the stitches.
- Cable (for Circular DPNs): The cable connects the needle points and creates a continuous loop, allowing for knitting in the round without interruption.
Comparison of DPN Types
The following table summarizes the key differences between the common types of DPNs:
| Type | Length | Material | Use |
|---|---|---|---|
| Straight DPNs | Variable (typically shorter) | Aluminum, wood, steel, or plastic | Creating seamless pieces, such as socks, mittens, or small projects; often preferred for more intricate designs |
| Circular DPNs | Variable (typically longer) | Aluminum, wood, steel, or plastic | Creating seamless pieces, such as socks or small projects; offering the convenience of a continuous loop |
Setting Up for Knitting with DPNs

Double-pointed needles (DPNs) offer a unique approach to knitting, enabling intricate shaping and complex designs. Mastering the correct techniques for holding and working with DPNs is crucial for achieving successful projects. This section will guide you through the setup process, including proper holding methods, casting on techniques, and variations for different stitch counts.Holding DPNs correctly is paramount to comfortable and efficient knitting.
The grip and positioning directly influence stitch control and overall comfort. Different grip techniques cater to individual preferences and project needs.
Holding Double-Pointed Needles
Effective use of DPNs hinges on a secure and comfortable grip. A firm yet relaxed hold prevents slippage and strain. Experiment with different grips to discover what feels most natural and allows for precise control.
Grip Techniques for Various Projects
Several grip techniques can be employed depending on the project and personal preference. The “pencil grip” involves holding the needles like pencils, suitable for beginners. The “knuckle grip” positions the needles closer to the knuckles, offering greater dexterity and control, particularly beneficial for intricate patterns. The “palm grip” positions the needles more within the palm, ideal for working with larger needles or more complex stitches.
These grip variations allow for tailoring the knitting experience to specific project requirements.
Casting On with Double-Pointed Needles
Casting on with DPNs introduces a slightly different approach compared to circular needles. It’s essential to maintain a secure grip while distributing the stitches evenly across the needles. The method for casting on with DPNs varies slightly based on the desired number of stitches.
Casting On with Different Stitch Counts
The casting-on process is adapted to the stitch count. A smaller number of stitches demands a more delicate approach to avoid entanglement, while a larger stitch count requires a more deliberate and even distribution. Accurate stitch distribution ensures an even foundation for the project.
Step-by-Step Guide for Casting On with DPNs
This table provides a step-by-step guide for casting on with DPNs, including variations for different stitch counts. Each step is clearly described, accompanied by a brief explanation and notes.
| Step | Description | Image | Notes |
|---|---|---|---|
| 1 | Hold the first two needles, with the tips pointing upwards, like you would hold a pair of scissors. | (Imagine a picture of two needles held in a “scissors” position) | Ensure a comfortable and firm grip. |
| 2 | Wrap the yarn around the needle that is pointed upward, slightly behind the tip. | (Imagine a picture of the yarn wrapped around the pointed needle) | This creates the first stitch. |
| 3 | Now, use the needle that is below to bring the loop around to the top, like making a slip knot. | (Imagine a picture of the loop being brought over by the bottom needle) | This forms the first stitch. |
| 4 | Repeat steps 2 and 3 for the desired number of stitches. | (Imagine a picture of multiple stitches being created) | Continue wrapping and pulling the yarn through to form stitches on both needles. |
| 5 | Once you have the desired number of stitches, secure the first stitch on the needle. | (Imagine a picture of the first stitch being secured) | This prevents the stitches from slipping off. |
| 6 | Continue to cast on until the desired number of stitches is on the needles. | (Imagine a picture of the finished casting on) | Adjust the grip and tension as needed to maintain a uniform stitch. |
Basic Knitting Techniques with DPNs
Double-pointed needles (DPNs) offer a unique approach to knitting, enabling the creation of intricate shapes and textures. Mastering basic techniques with DPNs is crucial for progressing to more advanced projects. This section details the fundamental knitting techniques using DPNs, including knit, purl, increase, and decrease stitches. Understanding these techniques will significantly enhance your knitting abilities.
Knit Stitch
The knit stitch is the foundational stitch in knitting. Using DPNs, the process is slightly different than with circular needles. The same principles of passing the needle over apply, but with the added complexity of managing multiple needles.
To knit a stitch on DPNs, insert the right-hand needle into the stitch on the left-hand needle. Wrap the yarn around the right-hand needle in the usual manner. Bring the yarn back over the stitch on the left-hand needle and off the left-hand needle. This creates a new stitch on the right-hand needle. Repeat this process for each stitch on the left-hand needle, moving stitches from left to right.
Purl Stitch
The purl stitch is the reverse of the knit stitch. The process for purling with DPNs is similar to knitting, but with a crucial difference in the way the yarn is wrapped.
To purl a stitch, insert the right-hand needle into the stitch on the left-hand needle, but instead of wrapping the yarn around the right-hand needle from front to back, wrap it from back to front. Bring the yarn back over the stitch on the left-hand needle and off the left-hand needle. This creates a purl stitch on the right-hand needle.
Repeat this process for each stitch on the left-hand needle.
Increasing Stitches
Increasing stitches add more stitches to the work, creating a fuller or wider piece. Multiple methods exist to increase stitches with DPNs, and choosing the right one depends on the desired outcome.
- Yarn Over: To increase a stitch using a yarn over, insert the right needle into the stitch on the left needle. Yarn over and then insert the right needle into the next stitch on the left needle. Knit the stitch. Repeat this for every desired increase.
- Slip Slip Knit: Insert the right needle into the stitch on the left needle. Slip the stitch off the left needle. Insert the right needle into the next stitch on the left needle. Knit the stitch. Repeat for every desired increase.
Decreasing Stitches
Decreasing stitches reduce the number of stitches, creating a narrower or more compact piece. Like increases, several methods are available for decreasing with DPNs.
- Knit Two Together: Insert the right needle into the next two stitches on the left needle. Knit these two stitches together, creating a single stitch on the right needle. Repeat for every desired decrease.
- Slip Slip purl: Insert the right needle into the next two stitches on the left needle. Slip the first stitch off the left needle. Purl the second stitch off the left needle. Repeat for every desired decrease.
Methods for Increasing and Decreasing Stitches
There are multiple methods for both increases and decreases. The choice depends on the pattern, the desired effect, and the knitter’s comfort level. Careful consideration of the stitch pattern is essential for achieving a pleasing aesthetic.
Stitch Patterns with DPNs
The following table illustrates various stitch patterns using DPNs.
| Stitch | Description | Diagram | Example |
|---|---|---|---|
| Knit | Pass the right needle over the left needle. | (Diagram would be a simple representation of this action) | Knitting a simple rectangle |
| Purl | Wrap the yarn around the right needle from back to front. | (Diagram would be a simple representation of this action) | Creating a textured fabric |
| Increase (Yarn Over) | Yarn over, then knit the next stitch. | (Diagram would illustrate the yarn-over action) | Creating a wider section |
| Decrease (Knit Two Together) | Knit the next two stitches together. | (Diagram would illustrate the knitting two together action) | Narrowing a section |
Working with DPNs in Various Projects
Double-pointed needles (DPNs) are versatile tools that extend beyond simple projects. Their unique structure allows for a wide range of techniques and applications, enabling knitters to create intricate and complex designs. This section will explore how to use DPNs effectively for both small and large projects, comparing their use in socks to other projects. Furthermore, some basic patterns and recommended projects will be presented for practice.
Working with DPNs for Small Projects
Small projects, such as amigurumi, decorative motifs, or even tiny accessories, often benefit from the precise control DPNs offer. The smaller gauge of DPNs allows for more detailed shaping and intricate designs. For example, when creating amigurumi, the use of DPNs enables the shaping of limbs, bodies, and facial features with exceptional precision. The controlled movement of stitches also allows for the creation of intricate lace patterns that are difficult to achieve with circular needles.
Working with small projects on DPNs allows for focused attention to detail, essential for achieving the desired aesthetics.
Working with DPNs for Larger Projects
While DPNs are often associated with smaller projects, they can be used effectively for larger items like sweaters or shawls, especially those requiring specific shaping. The key is to choose a suitable needle size and stitch pattern that doesn’t overwhelm the knitting process. Utilizing a stitch pattern that allows for smooth transitions between sections is also crucial. For example, a simple garter stitch or stockinette stitch can be easily implemented for larger items.
Carefully planned construction and stitch patterns are important for preventing stress on the needles and maintaining even tension.
Comparing Working with DPNs for Socks versus Other Projects
DPNs are particularly well-suited for knitting socks due to their ability to work in the round. This allows for seamless shaping and construction of the foot and leg of the sock. However, for other projects, the use of DPNs requires careful consideration of the project’s overall structure. The stitch pattern and project design should be considered in the decision to use DPNs for a particular project.
The choice between DPNs and circular needles depends on the complexity of the project and the knitter’s preference.
Simple Patterns Using DPNs
Developing simple patterns with DPNs can enhance the understanding of working with these tools. These patterns are designed to build confidence and introduce various techniques, making them valuable for beginners.
- Basic Seed Stitch: This pattern involves simple knit and purl stitches, creating a textured and visually appealing effect. It’s a fantastic way to practice the rhythmic movements and tension required when working with DPNs.
- Simple Ribbing: This pattern, incorporating knit and purl stitches in a consistent pattern, allows for the development of control and rhythm. Ribbing patterns are ideal for cuffs, borders, or any part of the project that requires a textured look.
- Lace Motif: Small, intricate lace patterns are easy to create with DPNs. These can be used to add decorative details to scarves, shawls, or other projects. The detailed work and the specific placement of the stitches is a good way to practice with DPNs.
Patterns Ideal for Practicing with DPNs
The selection of patterns for practicing with DPNs is essential for reinforcing the skills learned. These patterns are designed to reinforce understanding and technique.
- Small Amigurumi Projects: These projects offer excellent practice in shaping and working with small details. The controlled movements of DPNs are essential for the creation of complex amigurumi. Amigurumi projects, such as a simple animal or toy, are excellent for mastering the skills required when working with DPNs.
- Lace Shawls: Lace shawls often involve complex patterns, requiring careful attention to stitch placement and tension. Practicing with lace shawls will allow knitters to master the precision and dexterity required when working with DPNs.
- Simple Socks: Socks are excellent for developing skills in working with DPNs in a circular fashion, particularly in shaping the foot and leg. The use of DPNs for sock knitting allows knitters to develop a greater understanding of the process involved in shaping and maintaining consistent tension.
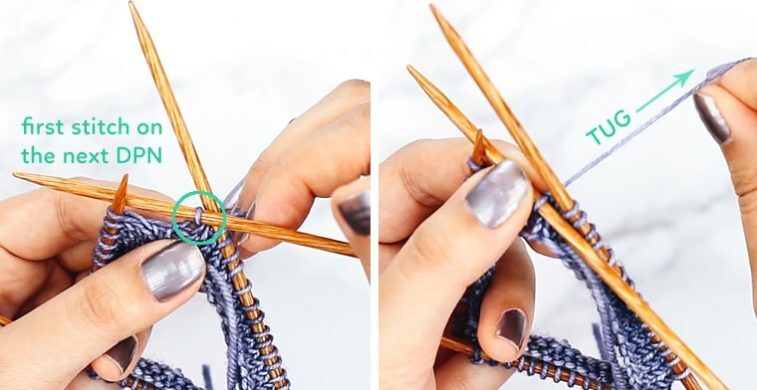
Troubleshooting Common Issues with DPNs

Mastering double-pointed needles (DPNs) can sometimes present challenges. This section will address common pitfalls encountered when working with DPNs, offering practical solutions for smooth and successful knitting projects. Understanding these troubleshooting techniques will significantly enhance your DPN knitting experience.Working with DPNs requires a unique approach, differing from traditional knitting needles. Maintaining consistent tension, preventing dropped stitches, and managing needle slippage are crucial aspects.
This section details common problems and provides effective solutions to overcome them.
Identifying Dropped Stitches
Dropped stitches are a frequent issue when working with DPNs. They can occur due to the intricate movements required when using multiple needles. Careful observation and precise technique are key to preventing and resolving dropped stitches.
- Recognizing a Dropped Stitch: A dropped stitch manifests as a gap in the knitting fabric. It’s easily noticeable by looking for an empty space or a missing loop on the needles. Carefully examine the work to identify the location of the dropped stitch.
- Re-picking the Dropped Stitch: To re-pick a dropped stitch, gently insert a needle under the dropped stitch. Using the tip of another needle, carefully lift the dropped stitch and place it back onto the needle. Ensure the stitch is correctly placed and secured.
- Preventing Dropped Stitches: Maintain a firm but not overly tight grip on the yarn while working. A slow and controlled rhythm will help to minimize the risk of dropped stitches. Ensure all needles are properly positioned to avoid unnecessary stress on the stitches.
Addressing Uneven Tension
Uneven tension can result in a distorted or lumpy appearance in the finished project. It is often caused by variations in the way stitches are knitted.
- Assessing Tension Variations: Examine the knitting for consistent stitch spacing and tightness. Look for sections where the stitches are noticeably tighter or looser than others. This visual inspection helps identify the areas with inconsistent tension.
- Adjusting Tension Techniques: If the tension is too tight, reduce the pressure on the yarn and needles. If the tension is too loose, increase the pressure and ensure a consistent grip. Try adjusting the yarn tension by either applying more or less pressure while knitting.
- Consistency in Technique: Maintain a consistent rhythm and pace throughout the knitting process. Variations in speed can lead to variations in tension. Practice maintaining consistent movements and pressures to achieve a uniform tension.
Managing Yarn Tension
Effective yarn tension management is vital for producing even, well-formed stitches. Variations in yarn tension can significantly affect the final outcome of a project.
- Evaluating Yarn Tension: Carefully observe the way the yarn is being pulled through the stitches. Ensure the yarn is neither too tight nor too loose. Pay attention to the feel of the yarn as you knit.
- Fine-tuning Yarn Handling: Adjust the amount of yarn being pulled through the needles, making sure the yarn is consistently feeding through. Maintain a balanced tension to prevent variations in the knitting pattern.
- Consistent Yarn Handling: Use the same techniques throughout the project to maintain uniformity. Consistency in yarn tension directly impacts the uniformity of the knitted fabric.
Preventing Needle Slippage
Needle slippage can cause stitches to become displaced or loose, leading to noticeable irregularities in the knitting. This can be addressed through various methods.
- Identifying Slippage Causes: Needle slippage can stem from several factors. Overly tight or loose yarn tension can contribute. Additionally, using worn-out or improperly lubricated needles can increase the risk of slippage.
- Improving Needle Grip: Ensure the needles are well-lubricated, ensuring a smooth glide through the stitches. Using the correct needle size and type is also crucial for maintaining a secure grip on the stitches.
- Maintaining Needle Care: Proper needle care, including cleaning and lubrication, is essential for maintaining a good grip and preventing slippage. This helps prevent build-up that can cause friction and slippage.
Summary Table: Common DPN Problems and Solutions
| Problem | Description | Cause | Solution |
|---|---|---|---|
| Dropped Stitch | A missing loop in the fabric. | Inconsistent needle handling or tension. | Gently lift and re-insert the dropped stitch. |
| Uneven Tension | Variations in stitch tightness. | Inconsistent yarn tension or knitting speed. | Adjust yarn tension and maintain a consistent pace. |
| Yarn Tension Issues | Tight or loose yarn throughout the work. | Incorrect yarn handling or inconsistent pressure. | Adjust yarn tension by adjusting grip and pressure. |
| Needle Slippage | Stitches shifting or becoming loose. | Tight/loose yarn tension, worn needles. | Ensure proper lubrication and maintain consistent tension. |
Advanced Techniques and Projects

Mastering double-pointed needles (DPNs) opens doors to a wide range of intricate and visually stunning projects. This section delves into advanced techniques for working with multiple DPNs, sophisticated increases and decreases, and creating complex patterns using cables and lace. Examples of intricate projects showcase the versatility and artistry of DPNs.
Working with Multiple DPNs
Working with multiple sets of DPNs simultaneously allows for the creation of more complex structures and textures. Coordinating the movements of multiple needles requires careful attention to stitch placement and tension. Practice is key to mastering this technique, which is crucial for projects involving multiple colors or intricate designs. Understanding how to handle multiple needles concurrently is essential for achieving seamless transitions and a consistent stitch pattern.
Advanced Increases and Decreases
Advanced projects often require more complex increases and decreases than basic patterns. These techniques can create interesting shaping and add visual depth. Several methods exist, each with advantages for specific projects.
- The ‘k2tog’ (knit two together) technique, when executed with DPNs, creates a smooth decrease. This technique is particularly useful for shaping decreases at the ends of rows.
- The ‘slipstitch decrease’ is another effective method for shaping and decreasing stitches. This technique can be used in various patterns to create specific shapes and details.
- The ‘kfb’ (knit front and back) increase, though often used with circular needles, can be adapted for DPNs. This approach is used for creating a new stitch between two existing stitches, increasing the stitch count.
Intricate Projects Suitable for DPNs
DPNs are ideal for projects requiring shaping, such as lace shawls, mitered squares, or textured garments. The ability to work in the round or on multiple needles simultaneously provides the necessary flexibility for shaping and creating complex patterns.
- Lace shawls, characterized by intricate openwork patterns, are often worked with DPNs to achieve precise stitch placement and shaping.
- Mitered squares, renowned for their symmetrical patterns and often used for blankets or wall hangings, are well-suited for DPNs.
- Textured garments, such as sweaters or cardigans, that need shaping in the round, benefit from the versatility of DPNs.
Working with Cables and Lace Patterns on DPNs
DPNs can handle the intricacies of cable and lace patterns. The ability to work in the round allows for more seamless transitions between stitches. Specific techniques are crucial for executing these patterns.
- For cables, careful placement of the stitches is essential to ensure the correct cabling pattern. This technique often requires multiple sets of DPNs and meticulous attention to needle positioning.
- Lace patterns are often characterized by intricate openwork patterns and require precise stitch placement. Using DPNs for lace allows for a smooth execution of these intricate designs.
“Careful attention to the stitch pattern and needle positioning is key for achieving the desired openwork effect.”
Advanced Knitting Techniques using DPNs
Several advanced techniques can be implemented when using DPNs, enabling knitters to create more elaborate and intricate projects. Understanding these techniques elevates the knitting process.
“Experimentation and practice are essential to master these techniques and achieve the desired results.”
- The ‘colorwork’ technique involves working with multiple colors in a pattern. DPNs can effectively handle these techniques by allowing the smooth transition between colors while maintaining stitch integrity. Carefully managing multiple colors on DPNs is crucial to avoid errors and inconsistencies.
- The ‘fair isle’ technique, a more complex form of colorwork, often requires precise placement and handling of colors. The DPNs, with their ability to handle multiple needles, can contribute to the complexity of the fair isle patterns.
Choosing the Right DPNs for Your Project
Selecting the appropriate double-pointed needles (DPNs) is crucial for achieving the desired results in your knitting projects. The correct size and material contribute significantly to the final look and feel of your work, influencing stitch density, comfort during the knitting process, and the overall aesthetic appeal. Careful consideration of these factors ensures a positive knitting experience and a satisfying outcome.Choosing the right DPN size is paramount to achieving the desired stitch density and project outcome.
The size of your DPNs directly correlates to the size of the stitches you create. A larger needle size results in a larger stitch and vice-versa. Using needles that are too small will make the project take longer and be more difficult to work with. Conversely, needles that are too large may lead to a loose stitch structure, affecting the final appearance.
Determining the Right Needle Size
The ideal needle size for a project depends on the yarn weight and desired gauge. Gauge refers to the number of stitches and rows per inch. Different yarn weights require different needle sizes for optimal gauge. For instance, a light fingering weight yarn typically needs smaller needles than a bulky yarn. A good starting point is to consult the yarn label for recommended needle sizes.
Experimentation may be necessary to find the perfect balance between needle size and stitch density.
Considering Needle Material
Needle material significantly influences the knitting experience and the final project. Different materials offer various properties, affecting comfort, durability, and potential interaction with the yarn. The choice of material depends on personal preference and the characteristics of the yarn being used.
Factors to Consider When Selecting DPNs
- Yarn weight: Different yarn weights require different needle sizes for optimal gauge. Matching the needle size to the yarn weight is essential for achieving the desired stitch density.
- Desired gauge: A precise gauge ensures uniformity and consistency throughout the project. Adjusting the needle size to meet the desired gauge will yield a more pleasing result.
- Personal preference: Some knitters prefer the feel of metal needles, while others prefer wood or bamboo. Consider the material that offers the best grip and comfort during the knitting process.
- Project requirements: Specific projects may require particular materials for durability or aesthetic reasons. Consider the expected stress on the needles and the overall design requirements.
Needle Size and Stitch Density
There’s a direct relationship between needle size and stitch density. Smaller needles create tighter stitches, leading to a denser fabric. Conversely, larger needles result in looser stitches, yielding a more open fabric. This relationship is crucial in achieving the desired drape and texture for a project. For example, a project requiring a close, textured fabric will benefit from smaller needles, while a project with a flowing, open design might require larger needles.
This connection between needle size and stitch density should be carefully considered to achieve the desired result.
Comparison of DPN Materials
| Material | Pros | Cons | Examples |
|---|---|---|---|
| Metal (Steel, Aluminum) | Durable, Precise stitch formation, Generally affordable. | Can be slightly colder to hold, potentially more prone to snags with certain yarns. | KnitPro, Addi |
| Wood | Warm and comfortable to hold, often beautiful aesthetic, generally smooth. | Potentially less durable than metal, may vary in quality across brands. | Clover, Knit Picks |
| Bamboo | Lightweight, comfortable to hold, often considered environmentally friendly. | May not be as durable as metal or wood in the long term. | Knit Picks, Addi |
| Plastic | Affordable, lightweight, often smooth surface. | May not be as durable as other materials, some types may be prone to scratching or warping. | Various brands offer plastic DPNs |
Closing Summary
In conclusion, this guide has provided a thorough overview of using double-pointed needles. We’ve covered everything from the fundamentals to advanced techniques, equipping you with the knowledge to tackle a wide range of knitting projects. By understanding the various aspects of DPNs, you’ll be well-prepared to confidently use them in your next knitting endeavors.